Showing posts with label chocolate. Show all posts

Friday, February 12, 2016

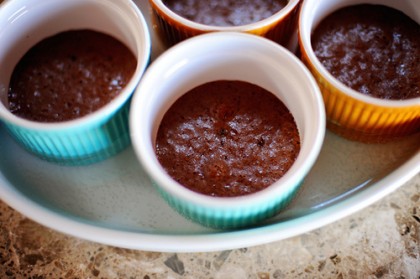
Foodie Friday- Pioneer Woman's Baked Fudge


So, my least favorite holiday is coming up this weekend. This is how I plan to indulge myself.


Delicious Baked Fudge

Prep: 10 Minutes Level: Easy
Cook: 50 Minutes Serves: 4
Ingredients

2 whole Eggs
1 cup Sugar
2 Tablespoons (heaping) Cocoa
2 Tablespoons Flour
1/2 cup Butter, Melted
1 teaspoon Vanilla Extract
Preparation

Preheat oven to 300 to 325 degrees.

Beat eggs until light in color. Beat in sugar until just combined. Add cocoa, flour, melted butter, and vanilla extract. Mix gently until well combined.

Pour batter into four large ramekins or one 8-inch square baking dish. Set ramekins or pan into a larger pan halfway full of water.

Bake 40 to 50 minutes, or until upper crust is crispy and the rest of the batter is firm but not set. Toothpick should come out…not clean, but mixture should not be overly runny. If you pull it out of the oven and have second thoughts, stick it back in for ten more minutes.

Serve with sweetened whipped cream or vanilla ice cream; whatever makes your skirt fly up.

Thursday, November 26, 2015

Thanksgiving, hell! It's Cake Day!


Ok, fine. Here's a Thanksgiving dinner, which I might add looks NOTHING like anything my family puts together. We don't have the patience to make it pretty- we just want to EAT!


Now for the good stuff!


Carrot Cake


Chocolate Cake (my favorite)


Spice Cake, with a cream cheese icing


Apple Walnut Cake- my version is made with a cream cheese glaze, but this one looks pretty good!

Saturday, November 7, 2015

Today is Bittersweet Chocolate with Almonds Day


This is a day I can totally get behind!
Dark chocolate with almonds is still my hands down favorite candy, although I can't eat it as much as I used to.

Saturday, August 1, 2015

Local Flavor Swap Show-Off

So, my partner for the Local Flavor Swap was Lennette from Florida. I received her box yesterday and it has some really cool stuff as you can see in the picture here:


I love it all, but the magnets may be my favorite thing! I don't remember if I told her about my magnet obsession, but I do love them. I should post a picture of my fridge one of these days so you can all see my ridiculous collection. I'm looking forward to trying that honey too. The chocolate bar melted in transit- darn summer heat!- but I'm sure it will still taste good. I also know just who to send that beautiful card to.

Anyway, many thanks to the lovely ladies at the Chaotic Goddess blog swaps for letting me play, and Lennette for being a great swap partner!

Friday, May 1, 2015

Foodie Friday- Tunnel of Fudge Cake

I *LOVE* a good chocolate cake and this is one of my favorites!

Quick Tunnel of Fudge Cake
Source: Chocolate from the Cake Mix Doctor by Anne Byrn
Servings: 16

FILLING
1 1/2 cups milk
1 pkg.(3.4 oz) chocolate fudge pudding and pie filling mix (not instant)
1 cup semisweet chocolate chips
1 Tbsp. butter

CAKE
vegetable oil spray for misting the pan
flour for dusting the pan
1 pkg (18.25 oz.) devil's food cake mix with pudding
1/2 cup vegetable oil
1/2 cup sour cream
1/2 cup water
4 large eggs
1 tsp. pure vanilla extract
2 cups finely chopped walnuts

Place the milk in a medium size saucepan and whisk in the pudding mix. Cook, stirring, over medium heat until the mixture comes to a boil, 4-5 minutes. Remove the pan from the heat and stir in the chocolate chips and butter. Stir until the pudding is smooth and thickened and the chocolate has melted. Set the pan aside.

Place a rack in the center of the oven and preheat the oven to 350 deg. F. Lightly mist a 12 cup Bundt pan with vegetable oil spray, then dust with flour. Shake out the excess flour. Set the pan aside.

Place the cake mix, oil, sour cream, water, eggs, and vanilla in a large mixing bowl. Blend with an electric mixer on low speed for 1 minute. Stop the machine and scrape down the sides of the bowl with a rubber spatula. Increase the mixer speed to medium and beat 2 min. more, scraping the sides down again if needed. The batter should look thick and well combined. Fold in the walnuts, making sure they are well distributed throughout the batter.

Reserve 2 cups of the batter. Pour the remaining batter into the prepared pan. Spoon the pudding filling in a ring on top of the batter, making sure it does not touch the sides of the pan. Spoon the reserved batter over the filling, smoothing it out with the rubber spatula. Place the pan in the oven.

Bake the cake until it springs back when lightly pressed with your finger and is just starting to pull away from the sides of the pan, 45 to 50 minutes. Remove the pan from the oven and place it on a wire rack to cool for 20 minutes. Run a long, sharp knife around the edge of the cake and invert it onto a rack to cool completely, 20 minutes more.

Meanwhile, prepare chocolate icing.

Place the cake on a serving platter and pour the warm icing over it. Let the cake rest for 10 minutes before slicing.

Slice and serve.

* Store this cake, wrapped in aluminum foil or plastic wrap, or in a cake saver, at room temperature for up to 1 week. Or freeze it, wrapped in foil, for up to 6 months. Thaw the cake overnight in the refrigerator before serving.

Her note: This cake contains a lot of walnuts simply because that's how Ella Rita Helfrich created it. If you want to cut back to 1-1/2 cups, that's fine. Just make sure the nuts are finely chopped so they don't interfere with the crumb of the cake. You can do this easily in a food processor or with a good sharp knife and a cutting board.

Pour your favorite chocolate glaze over the cake, or Martha's Chocolate Icing as I recommend here. Or just dust it with some confectioners' sugar and leave it as is. With the pudding inside, this cake needs little adornment. Note that I call for regular pudding mix here; not the instant kind."

MARTHA'S CHOCOLATE ICING
1 cup granulated sugar
5 Tbsp. butter
1/3 cup whole milk
1 cup semisweet chocolate chips

Place the sugar, butter, and milk in a medium-size saucepan over medium-high heat. Stir until the mixture comes to a boil, 3-4 min. Still stirring, let the mixture boil until the sugar dissolves, 1 minute. Remove the pan from the heat.

Stir in the chocolate chips, and continue to stir until the mixture is smooth and the chocolate has melted.

Spread the icing over the cooled cake or cupcakes of your choice.


My notes: I usually leave the nuts out altogether. I like them, but prefer the pure chocolate. I also usually skip the icing and use just a bit of powdered sugar over a slice or eat it plain.

Sunday, March 29, 2015

Mug of Comfort Exchange Reveal


So, Melissa did a wonderful job with the care package she sent me! Both of us were having a rough patch during the exchange, so we didn't get to know each other as well as I think we would have liked, but I also believe we plan on staying in touch. Despite that, she sent me a lovely stoneware mug without any idea that I *LOVE* stoneware. I'm looking forward to trying the teas- my parents snitched some of them before I could object, but that's fair since I bogarted the 3 cheese steaks we brought back from the Philly Deli. And it will teach me not to show them goodies I get unless it's via photograph! I've already enjoyed the cider- we had a freak winter blast again this week, no snow but it was cold enough for the cider and some cocoa!

I'm very pleased with how this exchange went. I'd like to thank the hosts for allowing me to participate and hope to do another one soon. Especially now that I've *FINALLY* figured out how to upload pictures to the blog!

Oh, and if you're curious to see what I sent to Melissa, go here!

Friday, February 13, 2015

Foodie Friday- A Chocolatey Treat

Happy Day Before Let's Make Single People Feel Like Crap Day. I plan to indulge in a few (dozen) of these tomorrow.

Found here.

No-Bake Dark Chocolate Almond Butter Bon Bons

Makes about 1 dozen

6 whole graham crackers

1/2 cup smooth almond butter

1/2 cup butter (8 tablespoons)

2cups powdered sugar

1 1/2 cups dark chocolate chips

Seal graham crackers in a large ziplock bag and then just completely destroy them with the flat side of a meat tenderizer. Or a rolling pin or a mallet or your own two golden fists of fury, whatever you want, just beat the bejesus out of those crackers until you are left with a sack of graham cracker powder, which you may then pour into a large bowl.

In a microwave-safe bowl, heat the almond butter and butter together until smooth; this should take no more than 1 minute of microwave time, in two 30-second intervals, mixing in between. Stir until blended, and then pour into the bowl with the graham cracker crumbs.

Add powdered sugar to the bowl and mix it all together until combined into a dough. It will take some time to get all of the powdered sugar incorporated. Patience is a virtue. Roll dough into small, 1-inch balls and spread out on a baking sheet. You may want to line this with parchment paper to make the next step easier, but at this juncture that is not required. Stick into the fridge or freezer to harden.

Melt dark chocolate chips (in a double boiler or in the microwave) and stir until smooth and perfect. Dunk each ball into the melted chocolate, and then return to the lined baking sheet. We like to do halfway in chocolate, but all the way would be, of course, totally allowed, because there is not such thing as too much chocolate. For the cleanest experience, dip balls by stabbing them with a long skewer and then placing them, skewer and all, back on the baking sheet. Keep it the fridge or freezer until ready to serve.

Friday, January 30, 2015

Foodie Friday: Homemade Zingers!

I was heartbroken when Hostess went out of business a few years ago. I was never a really big Twinkies fan, but I loved the cupcakes and chocolate zingers. A host of make-your-own recipes emerged shortly after and this is a really good one. Of course, Hostess is back in business now so to speak, so I can buy them again, but every now and then, I get in a baking mood.

Homemade Chocolate Zingers


Makes 12 cakes

For the devil's food cakes:

1/2 pound unsalted butter, softened

1 1/2 cups light brown sugar, packed

2 eggs

6 tablespoons unsweetened cocoa powder

1 1/2 teaspoons baking soda

1 teaspoon vanilla extract

1/4 teaspoon salt

1 1/2 cups all-purpose flour

2/3 cup sour cream

1/2 cup hot coffee


For the cream filling and chocolate frosting:

1/2 cup whole milk

2 tablespoons all-purpose flour

1 cup unsalted butter, softened, divided

1/2 cup granulated sugar

2 1/2 cups confectioners' sugar, divided

1 teaspoon vanilla extract, divided

1/4 cup dark unsweetened cocoa powder

1/4 cup chocolate syrup

1 pinch salt


To get started, you’ll need to grease the pan well, then combine the butter, sugar, eggs, cocoa, baking soda, vanilla extract, and salt in a mixing bowl. Beat in flour and sour cream, then add the hot coffee and mix until a smooth batter forms. Spread the batter into the baking pan as evenly as possible. Preheat the oven to 350º F and bake for 45 minutes, the chill the cake in the freezer until firm. This will help each cake retain a crisp shape when you cut into it to add the filling.


While you wait for the cake to chill, prepare the frosting and filling. I’ll admit, sometimes when I’m feeling lazy I substitute ready-made marshmallow fluff for the filling, but if you’re looking for authenticity, then this cream filling is a close approximation to the real thing.

To make the cream filling, whisk together the milk and flour in a small saucepan until it thickens to a pudding-like consistency, then transfer the mixture to a shallow dish and refrigerate until it cools completely. Once cool, whip the mixture with the softened butter and the granulated sugar for about five minutes, until it becomes fluffy. Add the confectioners' sugar and vanilla extract, then beat the mixture until well-combined. Transfer the filling to a piping bag or zip-top bag with the corner snipped.


When the cake is chilled, cut it into twelve snack cakes by making three evenly-spaced cuts in one direction, then four perpendicular cuts. These snack cakes end up being slightly larger than the original, but I doubt there will be many complaints. Use a serrated knife to cut a slit lengthwise on top of each snack cake, taking care not to cut all the way through.

Fill the cake with the cream filling until it bulges slightly, then pinch the cake together slightly so that a little of the filling squeezes out the top.


To make the chocolate frosting for the top, place the cocoa powder, confectioners' sugar, and butter in a large mixing bowl, and beat them until combined. Beat in chocolate syrup, vanilla extract, and salt, then transfer the frosting to a piping bag. A number 789 cake tip icer makes an authentic frosting stripe on top, but if you don’t have one, spread the icing on with an offset spatula then run the tines of a fork through the icing to create the characteristic ridges.


Store the cakes in an airtight container for up to two days -- if they last that long!

Saturday, January 24, 2015

Oopsie! Foodie Friday on Saturday- Almond Nutella Pizza

Thank you to the sharp eyed person who pointed out to me that I'd already posted yesterday's recipe a few months ago. Here is a new one to make up for my error.


Almond Nutella Pizza


1 ball pizza dough [4] (store-bought is OK)
Approximately 1/2 cup almond Nutella [5]
6 amaretti cookies, crushed
Lightly sweetened vanilla whipped cream for garnish

Directions

Preheat the oven to 500°F, setting a 10-to-12-inch cast-iron skillet in the oven at the same time.
Roll or stretch out the ball of pizza dough so that it's approximately an 8-inch circle; you're aiming for a thicker crust than is standard. If rolling the dough out, dust the rolling surface (either a large cutting board or clean countertop work well) with wheat bran or cornmeal to ensure that the dough does not stick.
Remove the cast-iron skillet from the oven, flip it upside down, and rub the exposed surface with oil using a paper towel. Carefully and quickly, arrange the pizza dough on top of the skillet.
Put back in the oven and cook for 8 to 12 minutes or until the crust is browned and puffy.
Move the baked pizza dough to a cutting board, and spread with Nutella. Top with crumbled amaretti cookies, and dot with dollops of whipped cream.


Notes

This pizza is best enjoyed hot out of the oven but is still quite tasty as leftovers the next day. If you don't feel like making homemade almond Nutella (though it is surprisingly easy to prep), I'd recommend Justin's Chocolate Almond Butter [3] or traditional Nutella. Chopped salted almonds are a solid alternative (or addition) to the crumbled amaretti cookies. Or hazelnuts if you use the original Nutella.

Friday, January 23, 2015

Foodie Friday- Nutella Hot Chocolate with Hazelnut Liqueur

Sometimes the simplest things are the best. This drink hits all the right notes!

INGREDIENTS

1 cup milk
2 tbsp. Nutella
1 tbsp. hazelnut liqueur, such as Frangelico (optional)
Whipped cream, for serving

PREPARATION

Heat milk in a 1-qt. saucepan over medium heat until just beginning to bubble at edges, about 3 minutes. Remove from heat and whisk in remaining ingredients until smooth. Top with whipped cream to serve.

Friday, October 24, 2014

Nutella Hot Chocolate with Hazelnut Liqueur

Who doesn't like a nice warm drink when the weather starts getting nippy? This one, found here, has become a new favorite!

INGREDIENTS
1 cup milk
2 tbsp. Nutella
1 tbsp. hazelnut liqueur, such as Frangelico (optional)
Whipped cream, for serving

PREPARATION
Heat milk in a 1-qt. saucepan over medium heat until just beginning to bubble at edges, about 3 minutes. Remove from heat and whisk in remaining ingredients until smooth. Top with whipped cream to serve.

How easy is this?!?

Friday, September 19, 2014

Foodie Friday: Coffee Nutella Swirl Ice Cream

Another no churn ice cream recipe! Yay! Found here

Coffee Nutella Swirl Ice Cream

Ingredients
1 packet instant coffee (I use Starbucks Via) or about 1/2 tablespoon from a jar
1/4 cup hot water
1 can (14 ounces) sweetened condensed milk (I use fat-free)
12 ounces (about 1 1/2 tubs) Cool Whip (I use fat-free)*
1/2 cup Nutella


Instructions
Mix instant coffee into 1/4 cup hot water. Stir and let sit to cool for 10 minutes.
Stir coffee mixture and sweetened condensed milk in a large bowl. (I like using a large Tupperware bowl, so it can be frozen in the same bowl.) Fold in Cool Whip.
Place Nutella in a small bowl and microwave for 20 seconds to thin it out. Pour slowly into ice cream mixture while folding. You don’t want to completely mix it in, you just want rivers of it flowing through the ice cream.
Cover and freeze for at least 4 hours or overnight until it becomes ice cream consistency.

Notes
*You can substitute freshly whipped cream for the Cool Whip. Whip 2 cups cold heavy whipping cream until stiff peaks form, and use all of it in place of the Cool Whip.

Mickey's note: I don't do fat-free ANYTHING. It's rich, but it's GOOD!!!


Wednesday, November 28, 2012

The Liddabit Sweets Candy Cookbook: How to Make Truly Scrumptious Candy in Your Own Kitchen!

The Liddabit Sweets Candy Cookbook: How to Make Truly Scrumptious Candy in Your Own Kitchen!

I saw this listed in the new books section on my library website and requested it, not expecting much of anything. Cookbooks lately just haven't appealed to me at all.

My reserved copy came in and I sat down on the couch with it. WOW. Jen & Liz have done a great job with this book! They don't just assume that the reader knows how to do things, but they also don't dumb their insructions down to the point that you feel your intelligence has been insulted. There are clear step-by-step instuctions for various techniques, tips for how to save failed attempts, and suggested variations on nearly every recipe.

My favorite section of one of the baking classes I took in culinary school was the one where we made candy. We mostly did chocolates, and I had hoped to get a chance to try other things. Sadly, that didn't happen, but this book has rekindled my desire to give it another shot. I've placed an order for a copy of my own and suspect some of my officers are going to be my guinea pigs as I try a few recipes out...

A+++

You'll want to give this one a shot.

Wednesday, March 7, 2012

The Cocoa Conspiracy- Andrea Penrose

The Cocoa Conspiracy: A Lady Arianna Regency Mystery (Lady Arianna Hadley Mystery)

When we last met Lady Arianna, she was about to marry the Earl of Saybrook. This volume opens with her in a booksellers shop, having just discovered a lovely book of botanical etchings that she decides to buy for her husband's birthday. The only problem is that a seemingly deranged man tries to take it from her and she winds up brawling with him to keep it. Arianna does, of course, kick his butt and retain possession of the book. She later discovers documents hidden in the binding of the book that lead her and the Earl, along with their medical friend Baz, into unmasking yet another murderous plot involving several European Royals as well as the possible ruination of several friends & loved ones. While unmasking traitors, Ari & Sandro also must deal with the nasty Government Agent Trentham, society folderol, house parties, traveling to Vienna, and their growing feelings for each other. They might have had to marry for appearances sake, but they have grown to love each other more than either of them is comfortable admitting. Also includes some delicious looking recipes, and a preview of the next book in the series, due out in the fall of 2012. Can't wait!

Wednesday, February 22, 2012

Chocolate: The British Chocolate Industry (Shire Library)

After Gail Carriger recommended the tea book reviewed a few weeks prior to this, I searched out some of the other books in the Shire Library Series. How could I resist a book about the history of the chocolate industry in Great Britain? It's a very brief, but informative little book. I had no idea that the Kit Kat bar orignated in England! I just assumed it was an American invention. That tidbit, and many more are included. There are loads of pictures of early advertisements, a brief look at modern chocolatiers in the UK, and a list of references for anyone wanting to know more about chocolate and its history. My only problem with this book? I'm out of chocolate and REALLY want some now!

Wednesday, January 4, 2012

Sweet Revenge- Andrea Penrose

Product Details

Well! I read this in one delighted sitting. Combine several of my favorites- in this case, the Regency era, chocolate, and a thumping good mystery with an unconvetional heroine and a broody dark hero- and watch me be entertained! Arianna is a former young lady of Quality, living under an assumed name, disguised as a male French chef. Someone poisons one of her dishes at a party and nearly kills the Prince Regent. Saybrook is drafted to find the attempted murderer- and discovers Arianna's secret, well, one of her secrets, in the process. An attempt on her life makes them unlikely allies who now have to work together to find out not only who tried to kill the Prince, but who caused Arianna's father to lose his place in society and what exactly they hope to gain. The give-and-take battle of wills between them is entertaining, and the ending is not totally unexpected, but still satisfying.