Tuesday, December 29, 2015

The year is almost over- HALLELUJAH!!!


This year wasn't quite as bad as the second half of 2014, but it was by far from my favorite. I'm really hoping for a better 2016. Not banking on it, but I'm hoping.

Christmas was what it was. I worked, I got sick, we had the family celebration on Sunday. A few of my favorite presents:


Not much else to report. Been kind of a cruddy month. I'm looking forward to getting a few days off. I probably won't do anything special, but at least I won't have to be at work!


Friday, December 25, 2015

Foodie Friday- Merry Christmas Breakfast edition- Smoked Salmon & Dill Hash


It might be too late to whip up this
tasty dish from Pioneer Woman & Friends today, but it would make a fabulous addition to your New Year's breakfast/brunch if you do that kind of thing! Or just make it whenever you feel like it- it's go no matter when you eat it. In fact, I made it as a dinner the other night.


Smoked Salmon & Dill Breakfast Hash

Prep: 15 Minutes Level: Easy
Cook: 20 Minutes Serves: 4
Ingredients

1 Tablespoon Vinegar
2 pounds Russet Potatoes, Cut Into 1/2-inch Dice
3 Tablespoons Plus 2 Teaspoons Olive Oil, Divided
1 Yellow Onion, Chopped
2 cloves Garlic, Minced
1/2 teaspoon Salt
1/2 teaspoon Ground Pepper
4 ounces, weight Smoked Salmon, Broken Into Pieces (lox is ok, but hot smoked salmon is much better for this)
2 Tablespoons Minced Fresh Dill
Preparation

Bring a large saucepan of lightly salted water to a boil over high heat. Stir in the vinegar. Add the russet potatoes and cook until just tender, 8–10 minutes. Drain.

Heat 2 teaspoons of olive oil in a large skillet (preferably cast-iron) over medium heat. Add the onions and cook, stirring occasionally, until the onions are starting to brown. Stir in the garlic and cook for 30 seconds. Transfer the onion mixture to a bowl and set aside.

Turn the heat to medium-high, add remaining 3 tablespoons of olive oil to the skillet and stir in the drained potatoes. Cook, stirring occasionally, until the potatoes are browned and cooked through, 15–20 minutes. Season with salt and pepper.

If the potatoes start to burn while cooking, turn the heat to medium. Stir the cooked onions into the potatoes, and add the smoked salmon and dill.

Stir to combine. Serve.

Monday, December 21, 2015

Not a holiday post


I am OVER the holiday hoopla. I spent all of my money & the last of my vacation time for this year to take my father to NC and I am done. The whole mess was traumatic and I'm not saying anything else about it other than NEVER AGAIN.

SO, ON TO SOMETHING ELSE.....

I have a zillion jackets & coats, so I needed another one like a hole in the head. But back in September, one of the catalogs that I get had this trench style fleece coat that I just fell in love with. I wanted it in black, but of course THAT wasn't available in my size, so I settled for gray. It was on sale, plus I had an additional discount code AND a frequent shopper reward from the company as well as a free shipping code, so I paid about $28 for a $80 coat.

Then, once it came, I decided that I didn't like the buttons on it. No biggie, a quick trip to the craft store should solve that. Right? Riiiiiiight.

A: count the number of buttons you're going to need AND measure them before you go to the craft store. I did neither. More on that in a minute.

B: when the hell did buttons get so ridiculously expensive?!? The ones I really liked started at $4-6 PER BUTTON. Since I thought I was replacing 7 of them, it seemed wrong to spend as much on buttons as I did on the he coat itself. Even with coupons, I was going to be paying a lot. So I bought 1 large button in a style that appealed to me & took it home to see how it would look.

Looked great, but it was too big. Ok, let's suit down and search the store's website. Maybe something I like & can afford will jump out at me. I found a set of 4 pretty purple & black swirled jewel tone buttons. The site said they were in stock at the store, but somehow I'd overlooked them. No problem. I took a quick look at the coat & came up with a total of 7 buttons.

I went back the next day and found them. Too small, & wrong style. I needed flat buttons & these had the peg back. So I looked for smaller versions of the big one I bought the day before. Eureka! Sold in sets of 2, a slightly different shape, but I liked them enough to go for it. Also, less expensive than the first couple of designs I looked at.


After all that, you'd think I would have gone home & started the great button replacement project. Those who know me, know what came next. The button bag got hung on the hanger with the coat and sat untouched for a couple of weeks...

...Until the day I looked at the forecast and saw the weather was finally going to get cold enough to need a coat rather than the fleece jackets I was wandering around in. (We've had an oddly warm winter) So I made myself sit down, snipped the first button off the jacket, and stitched the new one in place. Yay! Two more followed suit, easy peasy. That's when I discovered that I had miscounted and the body of the coat only had 3 buttons. No problem, I'll replace the 2 on the belt loops & have 3 left of the 8 I bought.

You guessed it. The belt loop buttons were SMALLER than the body ones. Arrrgh! Back to the stupid store. The brand I bought did make a smaller button in the same style/color, but in a different shape. I grabbed a pack of two, paid for them (after sharing my tale of woe & frustration with the amused cashier- I spend so much time there that this girl knows me on sight) and went home to finish this damned project.


Stitched the two new buttons on and started to congratulate myself when something hit me. I'd hung the coat up to take a picture, but only one belt loop button appeared to be replaced. WTF?!? I yanked the coat down & started examining it, because I *KNOW* I replaced two buttons. I was kind of right. That's when I realized that there was a THIRD belt loop button on the BACK of the coat, and that was the one I'd stitched on.


I am not embarrassed to admit I threw a shrieking tantrum. I should be, but I'm not. It was my own fault for not paying attention, counting correctly, etc. So I drove back to the craft store ONE MORE TIME for the final button. My friendly cashier started laughing when I stomped through the door with a face like thunder. "Oh dear," she said. "How off was it this time?"

Now, a smart person would have brought all of the wrong/excess buttons back for an exchange. As I've already proven, this project had turned me into the village idiot. Not only had I shredded my receipts, I'd torn all the buttons off their cardboard backing when I thought they'd get used, so I was stuck with them.

I paid for the (hopefully) final pair of buttons and went home, determined to finish this thing once & for all. I replaced the LAST button, went over the coat with a fine tooth comb (and a lint roller because the little black cat finally came to see what her mama was losing her damn fool mind over and rolled on it) and realized I was really truly finished. Tears were shed, and the coat was hung up for a picture:

And then the weather warmed up again, so it was another month before I got to wear the damned thing!

Friday, December 18, 2015

Foodie Friday: Gouda & Sage Biscuits


Don'tthese look delicious?!?

Simple Gouda and Sage Biscuits
Fluffy, buttery and flavorful biscuits made with gouda and sage. Easy, quick, and perfect for special occasions.

YIELD: 10 biscuits PREP TIME: 10 minutes COOK TIME: 12 minutes TOTAL TIME: 22 minutes
Ingredients:

1 cup milk (see note)
1 tablespoon apple cider vinegar
1 1/2 cups white whole wheat flour
1 1/4 cups unbleached all purpose flour
1 tablespoon cane sugar
1 1/2 tablespoon baking powder
1 1/4 teaspoon sea salt
¼ teaspoon ground black pepper
6 tablespoons unsalted butter, cubed and chilled
4 ounces gouda cheese, shredded (about 1 cup), divided
1/4 cup sage leaves, packed, finely chopped
Directions:

Preheat oven to 425
Measure out 1 cup of milk. Remove 1 tablespoon and set aside to use later.
Pour 1 tablespoon of apple cider vinegar into the cup of milk. Mix and let sit for 5 minutes.
In a large bowl, whisk together the flours, sugar, baking powder, salt, and pepper. Add the cubes of butter, and use a pastry blender/your hands to rub in the butter until you only have small pieces visible in the dough.
Fold in the sage and 1/2 of the cheese, and then pour in the milk and vinegar mixture. Use a wooden spoon to mix until a loose dough forms. Turn out onto a floured surface, and knead for one minute, until you have a smooth dough.
Roll out into 1/2-inch thickness, and use a 2 5/8 biscuit cutter to cut out biscuits. Place biscuits on a parchment-lined baking sheet. Form the scraps into a ball and roll out again into 1/2-inch thickness, and cut out biscuits. You should end up with 10 biscuits total.
Brush the remaining tablespoon of milk on the biscuits, then top with remaining cheese. Bake for 12-14 minutes, until lightly golden on top.
If not eating right away, store in an airtight container and reheat at 325 for 10 minutes.
You can replace the milk and apple cider vinegar with 1 cup buttermilk. I find that when I buy a carton of buttermilk it ends up sitting in my fridge unused, so I make my own.
Nutrition Information: Serving Size: 1 biscuit, Calories: 240, Sugar: 3.2g, Sodium: 390mg, Fat: 11.1g, Saturated Fat: 6.8g, Carbs: 28.8g, Fiber: 2.6g, Protein: 7.8g, Cholesterol: 33mg


I'm wondering how these would be made with smoked Gouda? I may have to try it.

Friday, December 11, 2015

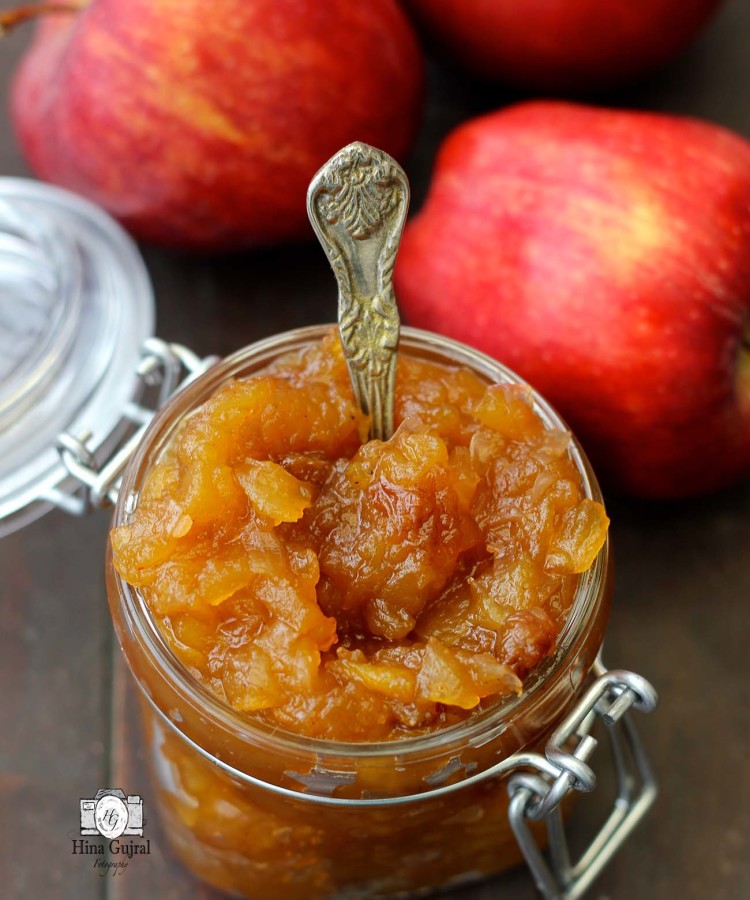
Foodie Friday- Apple & Raisin Chutney


Yes, another one. This is good with roasted pork, cold ham, or used as a topping for bar cookies. I'm sure you can probably think of other uses!


Apple and Raisin Chutney
Yields 200 gram
Apple and Raisin Chutney is a British style savory spread made with apples and raisin.
Prep Time: 30 min, Cook Time: 30 min, Total Time: 1 hr


Ingredients
3-4 apples, peeled, cored and chopped
4 medium onions, peeled and finely chopped
1 lemon, juiced
2 tbsp vinegar
1/2 cup raisins
Salt to taste
1/2 cup sugar or to taste
1 tsp ground cinnamon
1 tsp oil


Method


To make Apple And Raisin Chutney recipe, begin by heating oil over medium heat in a pan. First, saute the chopped onion for a minute or two, until aromatic.
Next, add the chopped apples along with cinnamon, salt, vinegar and lemon juice to the pan. Stir to combine and continue to cook on a medium-low heat till apples are soft and mushy.
Once apples turn mushy add the raisins and sugar. Stir to combine and gently mash the chutney with a potato masher while it is on heat.
Turn the heat to low and allow it to simmer until all the excess liquid is evaporated and the chutney begins to turn thick. Once the apple raisin chutney has begun to turn thick, turn off the heat.
Let the chutney cool down to room temperature.
Then spoon the Apple And Raisin Chutney into clean, dry, glass jars and seal with the lid.
Store the Apple and Raisin Chutney in the fridge.
Make sure to use clean and dry spoon to serve the chutney to ensure that it lasts longer.

Friday, December 4, 2015

Foodie Friday: Caramelized Red Onion Chutney


Ugh. One holiday down, several to go. I'm tired of buying meaningless gifts for people, so this year I'm thinking about making them instead. Food gifts are a fun & creative way to show your affection. This one would probably appeal to my mom. If I have any left after I try it, I might even give her some of it!


Caramelised Red Onion Chutney
Yield: 4 - 6 small jars


Ingredients

2 tbsp olive oil
30g unsalted butter
3 cloves garlic, finely minced
1 kg red onions, thinly sliced
a pinch of salt & pepper
60g golden caster sugar
300ml red wine
150ml white wine vinegar

Instructions

Heat the oil and butter in a large frying pan. Add the garlic, sliced onions, salt & pepper. Cook over a low heat for about an hour, stirring occasionally. The oil/butter should have mostly evaporated and the onions should be very soft.
Sprinkle over the sugar and stir. Cook for a further 10 minutes before adding the red wine and vinegar.
Simmer for about 45 minutes until most of the liquid has evaporated.When you run a spoon across the bottom you should be able to see the pan for a few seconds before the syrup spills in.
Remove from the heat and transfer to sterilised jars while still hot. Seal and leave to cool.
Once opened, store in the fridge and use within a month. Unopened jars should last for months.